2004 Jeep Grand Cherokee Lifted: Elevating Your Off-Road Adventure
2004 Jeep Grand Cherokee Lifted: Elevating Your Off-Road Adventure jeeps.truckstrend.com
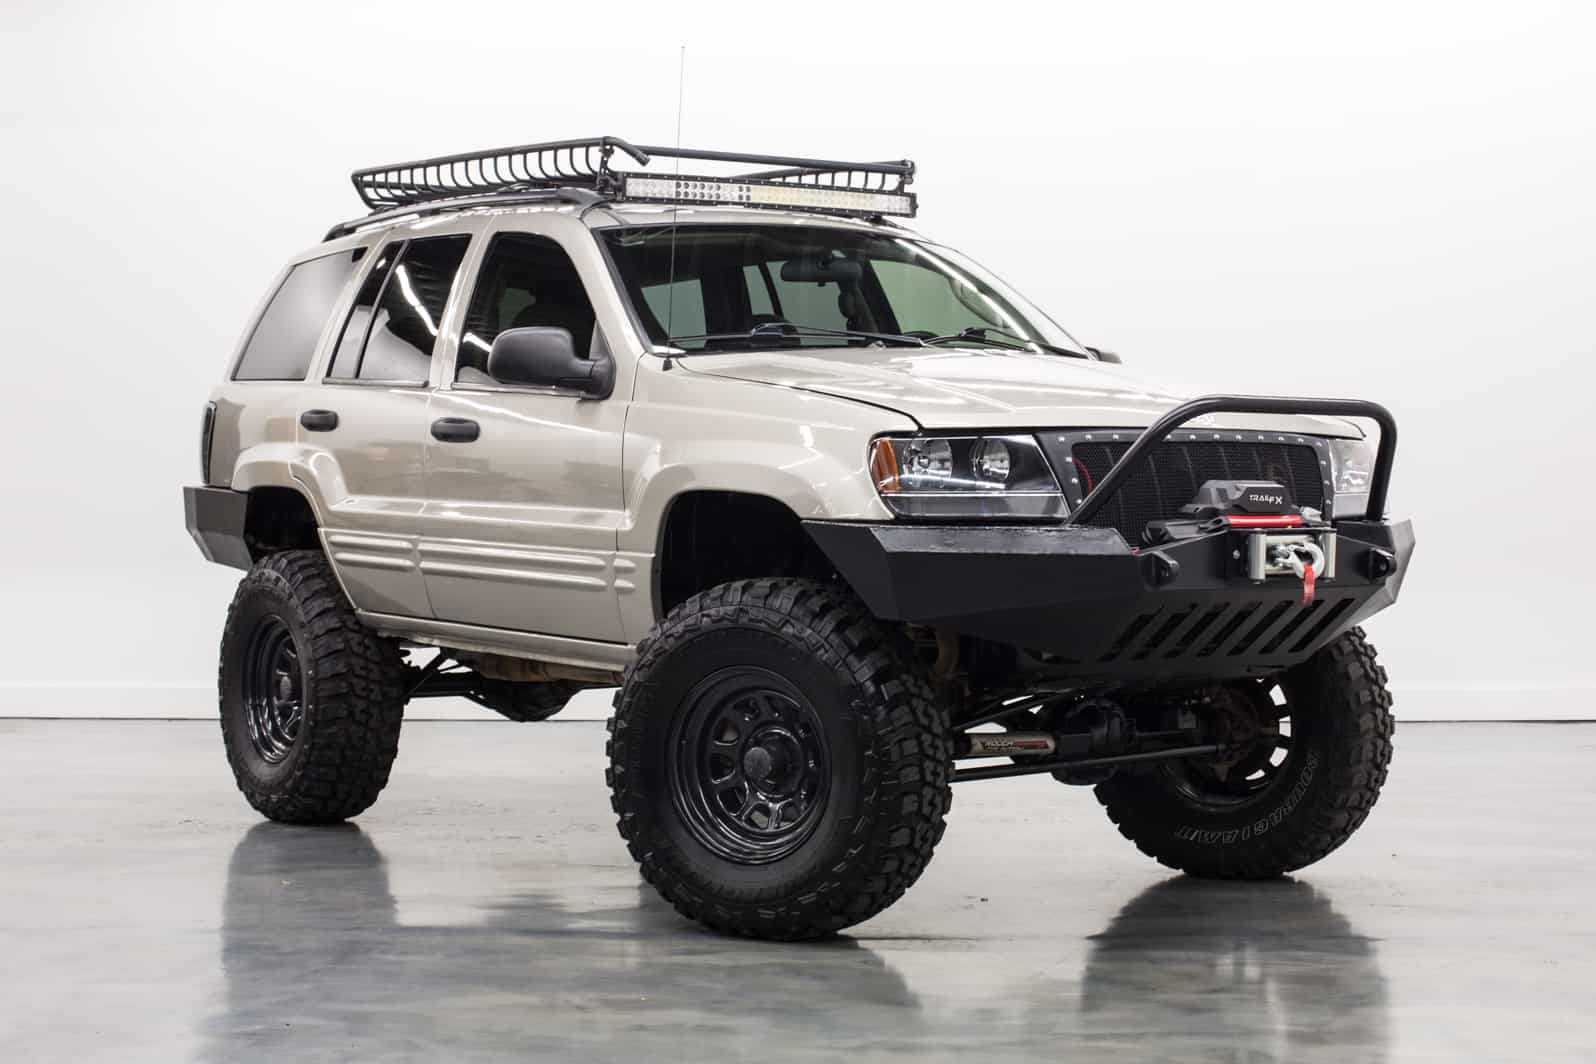
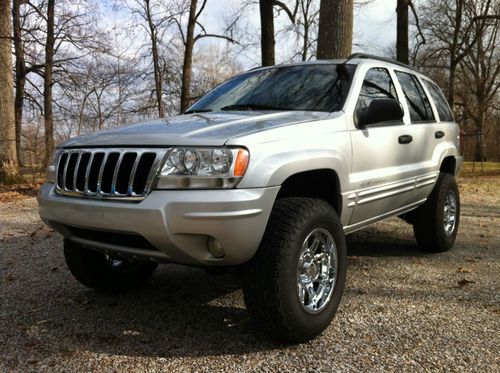
The 2004 Jeep Grand Cherokee, part of the WJ generation (1999-2004), stands as a testament to Jeep’s enduring legacy of combining rugged capability with everyday comfort. While lauded for its robust unibody construction, solid axles, and potent powertrain options (including the venerable 4.0L I6 and powerful V8s), the stock WJ, like many SUVs, has its limitations when venturing far off the beaten path. This is where the concept of a "lifted" 2004 Jeep Grand Cherokee comes into its own.
Lifting a vehicle involves modifying its suspension to increase its ground clearance and often, to accommodate larger tires. For the 2004 Grand Cherokee, a lift transforms it from a capable family hauler into an formidable off-road machine, capable of tackling more challenging trails, traversing deeper ruts, and presenting a far more aggressive, commanding aesthetic. This comprehensive guide will delve into the world of lifting a WJ, exploring its benefits, the various components involved, the installation process, potential challenges, and what to expect from your newly elevated ride.
2004 Jeep Grand Cherokee Lifted: Elevating Your Off-Road Adventure
Why Lift Your 2004 Jeep Grand Cherokee? The Benefits Unveiled
The decision to lift a 2004 Grand Cherokee isn’t purely about aesthetics; it unlocks a new realm of performance and capability.
- Improved Ground Clearance: This is arguably the most significant benefit. By raising the vehicle’s body and chassis higher off the ground, you drastically reduce the risk of scraping the undercarriage on rocks, logs, or uneven terrain. This is crucial for navigating technical trails without damaging vital components like the differential, transfer case, or exhaust.
- Accommodation for Larger Tires: A stock WJ has limited space for larger diameter tires. A lift creates the necessary clearance, allowing you to fit more aggressive off-road tires (All-Terrain or Mud-Terrain). Larger tires not only enhance traction on loose surfaces but also effectively increase your ground clearance even further, as the lowest point of your vehicle is often the differential pumpkin.
- Enhanced Off-Road Geometry: Lifting improves crucial off-road angles:
- Approach Angle: The maximum angle a vehicle can climb without the front bumper hitting the ground.
- Departure Angle: The maximum angle a vehicle can descend without the rear bumper hitting the ground.
- Breakover Angle: The maximum angle a vehicle can clear without its undercarriage touching the ground between the axles.
All these angles are significantly improved with a lift, allowing the WJ to conquer steeper obstacles and crest sharper peaks.
- Increased Suspension Articulation: While not all lift kits provide this equally, those designed with longer control arms or specific shock absorbers can allow the wheels to move up and down independently to a greater extent. This "flex" keeps more tires in contact with the ground over uneven terrain, maintaining traction and stability.
- Aesthetic Appeal: Let’s be honest, a lifted Grand Cherokee just looks cooler. It transforms the vehicle’s stance from a mundane SUV to an imposing, adventure-ready beast, turning heads both on and off the road.

Understanding Lift Kit Types for the WJ
Choosing the right lift kit for your 2004 Grand Cherokee depends heavily on your budget, intended use, and desired lift height.
- Spacer Lifts (Budget/Mild Lift): These are the simplest and most affordable. Polyurethane or aluminum spacers are installed above the factory coil springs, effectively raising the vehicle.
- Pros: Inexpensive, easy to install, maintains factory ride quality (as original springs/shocks are retained).
- Cons: Primarily cosmetic, offers minimal performance improvement, limits tire size increase, doesn’t improve articulation. Typically 1.5-2.5 inches.
- Coil Lifts (Performance/Moderate Lift): This involves replacing the factory coil springs with longer, often stiffer, aftermarket springs. They are typically paired with longer, performance-tuned shock absorbers.
- Pros: Better performance than spacers, improved ride quality (with good shocks), allows for larger tires, good value.
- Cons: More involved installation, can introduce driveshaft vibrations at higher lifts without additional modifications. Typically 2.5-4 inches.
- Short-Arm Kits: These are common coil lifts that replace the factory short control arms with new, often stronger, fixed or adjustable short arms. They are a good balance of performance and cost.
- Long-Arm Kits (High Performance/Aggressive Lift): These are the most comprehensive and expensive options. They replace the factory short control arms with much longer ones, relocating their mounting points further back on the frame.
- Pros: Superior articulation, better ride quality on-road due to flatter control arm angles, excellent off-road performance, allows for very large tires (4+ inches of lift).
- Cons: Expensive, complex installation requiring welding and cutting, significant commitment. Often requires additional modifications like a Slip Yoke Eliminator (SYE) and custom driveshaft.

Key Components of a WJ Lift Kit
Regardless of the type, a comprehensive lift kit for your Grand Cherokee will typically include several key components designed to work in harmony:
- Coil Springs/Spacers: The primary component for achieving lift height.
- Shock Absorbers: Longer shocks are essential to accommodate the increased suspension travel. They are often tuned for specific lift heights and driving conditions.
- Control Arms (Upper & Lower): These link the axle to the frame. Longer or adjustable control arms are crucial for maintaining proper caster angle (which affects steering stability) and wheelbase with higher lifts.
- Track Bar (Front & Rear): This bar centers the axle under the vehicle. Lifting a WJ will shift the axle sideways, requiring an adjustable track bar to recenter it and prevent "bump steer."
- Sway Bar Links: Extended links are needed to connect the sway bar to the axle, maintaining proper sway bar geometry and preventing binding.
- Brake Line Extensions: For lifts over 3 inches, factory brake lines may become taut at full suspension droop, requiring extensions or replacement with longer lines for safety.
- Bump Stop Extensions: These prevent the suspension from compressing too far and causing damage to components or tires rubbing fenders.
- Steering Stabilizer: While not always included, an upgraded steering stabilizer is highly recommended to help dampen vibrations and improve steering feel, especially with larger tires.
- Transfer Case Drop (Optional/Temporary): A simple spacer kit that lowers the transfer case slightly to reduce the driveshaft angle and mitigate vibrations. Often a temporary solution before an SYE.
- Slip Yoke Eliminator (SYE) & CV Driveshaft (For 3.5"+ Lifts): The ultimate solution for driveshaft vibrations on higher lifts. The SYE replaces the factory slip yoke on the transfer case, allowing for a stronger, smoother CV-style driveshaft.
The Lifting Process: A General Guide & Important Considerations
Lifting a 2004 Grand Cherokee can range from a relatively straightforward DIY project (spacer lift) to a complex undertaking best left to professionals (long-arm kit).
1. Planning and Research:
- Define Your Goal: How much lift? What tire size? What’s your primary use (daily driver, light trails, hardcore rock crawling)?
- Budget: Factor in the kit cost, installation (if professional), alignment, and potentially new tires and wheels.
- Research Kits: Read reviews, watch installation videos, and consult Jeep forums (like NAXJA or Grand Cherokee forums) for insights on specific kits and common issues.
2. Tools & Safety:
- Essential Tools: Floor jack, jack stands (crucial!), wrench sets, socket sets, torque wrench, pry bar, penetrating oil, spring compressor (if not using pre-assembled coils).
- Safety First: Always use jack stands, wear safety glasses, and never work under a vehicle supported only by a jack.
3. Pre-Installation Checks:
- Inspect existing suspension components (bushings, ball joints, tie rods, wheel bearings) for wear. Replace any worn parts before installing the lift, as they will be under increased stress.
4. Step-by-Step Overview (Simplified):
- Preparation: Loosen lug nuts, lift vehicle, secure on jack stands, remove wheels.
- Disassembly: Disconnect shocks, sway bar links, brake lines (if extending), track bar, and control arms. Carefully lower axles to relieve tension on springs.
- Installation: Install new coil springs/spacers, new shocks, extended sway bar links, adjustable track bar, and new control arms.
- Reassembly: Reconnect all components, ensuring proper torque on all bolts.
- Post-Installation: Lower vehicle, torque lug nuts.
5. Crucial Post-Installation Steps:
- Professional Alignment: This is non-negotiable. Lifting changes suspension geometry, requiring professional alignment to correct camber, caster, and toe. This prevents premature tire wear, improves handling, and reduces steering issues.
- Test Drive: Drive slowly at first, listening for unusual noises, feeling for vibrations, and checking steering response. Gradually increase speed.
- Re-Torque: After 50-100 miles, re-torque all suspension bolts. Components settle, and bolts can loosen slightly.
Professional Installation vs. DIY:
- DIY: Saves money on labor, provides a sense of accomplishment, and allows for learning. Best for simpler spacer or coil lifts.
- Professional: Ensures correct installation, proper torque, and usually includes alignment. Recommended for complex kits (long-arm) or if you lack tools/experience.
Addressing Common Challenges & Solutions
Lifting a WJ, especially beyond 2.5-3 inches, often introduces new challenges that need to be addressed for optimal performance and safety.
- Driveshaft Vibrations: This is the most common issue with 3"+ lifts. The increased driveshaft angle causes vibrations, particularly noticeable during acceleration.
- Solutions: A transfer case drop (TC drop) can help by slightly lowering the transfer case to flatten the driveshaft angle. The most effective solution for higher lifts is a Slip Yoke Eliminator (SYE) paired with a CV (Constant Velocity) driveshaft, which allows for much steeper operating angles without vibrations.
- Steering Issues (e.g., "Death Wobble"): This terrifying phenomenon involves violent, uncontrollable oscillation of the front wheels. It’s often triggered by hitting a bump and can be caused by a combination of factors:
- Solutions: Proper alignment (especially caster angle), a high-quality adjustable track bar to keep the axle centered, good condition tie rod ends and ball joints, and a heavy-duty steering stabilizer. Ensure all steering components are tight and free of play.
- Tire Rubbing: Larger tires can rub against fenders, fender liners, or control arms during turns or suspension compression.
- Solutions: Proper wheel backspacing (offset), fender trimming (cutting away parts of the fender), or adding bump stop extensions to limit upward wheel travel.
- Brake Line Length: As mentioned, ensure brake lines are long enough at full droop to prevent damage.
- Exhaust Clearance: The front driveshaft can sometimes contact the exhaust pipe on higher lifts, especially under articulation. Exhaust modifications may be needed.
- Increased Wear on Components: Lifting puts more stress on ball joints, control arm bushings, and wheel bearings. Regular inspection and timely replacement are crucial.
Tires and Wheels: Optimizing Your Lifted WJ
The right tires and wheels are just as important as the lift kit itself.
- Tire Size:
- 2" Lift: Typically allows for 265/75R16 (approx. 31.6") or 245/75R17 (approx. 31.5") with minor trimming.
- 3" Lift: Can usually clear 265/75R16, 265/70R17 (approx. 31.6"), or even 255/80R17 (approx. 33.1") with fender trimming and proper backspacing.
- 4"+ Lift: Opens the door for 33-inch tires (e.g., 285/75R16, 285/70R17) and sometimes even 35-inch tires with significant trimming and possibly wider fenders.
- Tire Types:
- All-Terrain (AT): Good balance of on-road comfort and off-road traction.
- Mud-Terrain (MT): Aggressive tread for maximum off-road grip, but noisier and less comfortable on pavement.
- Wheel Backspacing: This is critical. For larger tires, you’ll typically need less backspacing (a smaller positive or even negative offset) to push the wheel further out from the hub, providing clearance from control arms and inner fender wells. Common recommendations are 4.5" backspacing or less.
Cost Guide: Lifting Your 2004 Jeep Grand Cherokee
The cost of lifting a 2004 Grand Cherokee can vary dramatically based on the type of lift, brand quality, and whether you opt for DIY installation or professional help. Here’s an estimated breakdown:
| Item/Service | Description | Estimated Cost (USD) | Notes |
|---|---|---|---|
| Spacer Lift Kit | 1.5" – 2.5" polyurethane or aluminum pucks/spacers | $100 – $300 | Cheapest option, mostly for aesthetics. |
| Coil Lift Kit (Basic) | 2" – 3" new coil springs and matching shocks (non-adjustable arms) | $400 – $1,000 | Good entry-level performance lift. |
| Coil Lift Kit (Advanced) | 3" – 4" new coils, performance shocks, adjustable control arms, adjustable track bar | $1,000 – $2,500 | Better ride quality and articulation, addresses geometry better. |
| Long Arm Kit | 4"+ lift, long control arms, often requires welding/cutting, SYE ready | $2,000 – $5,000+ | Top-tier performance, best articulation, most complex and expensive. |
| Professional Installation | Labor for lift kit installation | $400 – $1,500+ | Varies by complexity of kit and shop labor rates. |
| Alignment | Post-lift suspension alignment | $80 – $200 | Absolutely essential for safety, handling, and tire wear. |
| Larger Tires (Set of 4) | 31"-33" All-Terrain (AT) or Mud-Terrain (MT) tires | $800 – $1,500+ | Significant cost, depends on brand, size, and type. |
| Aftermarket Wheels (Set of 4) | To achieve proper backspacing for larger tires | $400 – $1,000+ | Optional if factory wheels work, but often needed for optimal fitment. |
| Slip Yoke Eliminator (SYE) & CV Driveshaft | Essential for 3.5"+ lifts to prevent driveshaft vibrations | $400 – $800 | Highly recommended for serious off-road use and higher lifts. |
| Heavy-Duty Steering Stabilizer | To dampen vibrations and improve steering feel with larger tires | $50 – $150 | Recommended upgrade. |
| Miscellaneous Parts | Extended brake lines, bump stop extensions, exhaust mods, etc. | $50 – $300 | Small, but often necessary for a complete and safe installation. |
| TOTAL ESTIMATED COST (DIY – Basic Spacer) | $1,300 – $2,800 | (Spacer Kit + Tires + Alignment) | |
| TOTAL ESTIMATED COST (Professional – Mid-Range Coil) | $2,500 – $5,000 | (Coil Lift Kit + Professional Install + Tires + Alignment) | |
| TOTAL ESTIMATED COST (Professional – High-End Long Arm) | $5,000 – $9,000+ | (Long Arm Kit + Professional Install + Tires + Wheels + SYE) |
Note: These are estimates. Prices can fluctuate based on specific brands, regional labor rates, sales, and the condition of your existing components (e.g., if you need to replace worn ball joints during the lift).
Frequently Asked Questions (FAQ) about Lifting a 2004 Jeep Grand Cherokee
Q1: How much lift can I put on a WJ Grand Cherokee?
A1: You can comfortably run 2-3 inches of lift with minimal additional modifications. Lifts of 3.5-4.5 inches are common but typically require an adjustable track bar, longer control arms, and often an SYE/CV driveshaft to address driveshaft angles and steering geometry. Lifts above 4.5 inches usually necessitate a long-arm kit and extensive modifications.
Q2: Do I need new control arms when lifting my WJ?
A2: For lifts under 2.5 inches, stock control arms might suffice, though adjustable arms are always better for correcting caster. For 2.5 inches and above, adjustable control arms (either short or long) are highly recommended to maintain proper suspension geometry, correct caster, and prevent steering issues like "death wobble."
Q3: Will lifting affect my ride quality?
A3: It depends on the lift kit. Spacer lifts generally retain stock ride quality. Coil lifts, especially with good quality shocks, can often improve ride quality over worn factory components. However, stiffer springs and performance shocks might make the ride firmer. Long-arm kits can actually improve on-road ride quality due to flatter control arm angles.
Q4: What is "death wobble" and how do I prevent it?
A4: "Death wobble" is a violent, uncontrollable oscillation of the front axle. It’s not caused by the lift itself, but by worn steering/suspension components combined with altered geometry from the lift. Prevention involves ensuring all steering components (tie rod ends, ball joints), track bar, and control arm bushings are in excellent condition, having a proper alignment (especially caster), and using a quality adjustable track bar.
Q5: Can I lift my WJ without changing tires?
A5: Yes, you can. A lift without larger tires will still give you increased ground clearance. However, the full benefits of a lift, especially aesthetic and maximum off-road capability, are usually realized with larger, more aggressive tires.
Q6: Is it legal to lift my vehicle?
A6: Vehicle modification laws vary by state and country. Some regions have limits on maximum vehicle height or tire protrusion. Always check your local regulations before performing significant modifications.
Q7: Do I need a transfer case drop or SYE?
A7: For lifts around 2.5-3 inches, a transfer case drop might be sufficient to mitigate driveshaft vibrations. For lifts above 3-3.5 inches, an SYE (Slip Yoke Eliminator) combined with a CV (Constant Velocity) driveshaft is the preferred and most effective solution to eliminate vibrations and improve driveline reliability.
Conclusion: Unleashing the WJ’s True Potential
The 2004 Jeep Grand Cherokee, particularly the WJ generation, is an exceptional platform for modification. Lifting it unlocks a level of off-road capability that transforms it from a capable SUV into a formidable trail machine. From navigating challenging terrain with improved ground clearance to accommodating larger, more aggressive tires for enhanced traction, the benefits are clear.
While the journey of lifting your WJ involves careful planning, component selection, and potentially addressing new challenges, the rewards are immense. A properly lifted Grand Cherokee not only looks the part but performs it, ready to tackle adventures far beyond the pavement. By understanding the types of lifts, the components involved, the installation process, and the potential pitfalls, you can confidently embark on this transformation, ensuring your 2004 Jeep Grand Cherokee is truly ready to conquer any trail you throw at it. Enjoy the elevated view and the enhanced freedom that comes with your newly lifted WJ.